

Real Bone Graft Case Part 2: Socket Preservation Graft Healing, CBCT Implant Planning, and Implant Surgery Day
See how we planned this implant case in our 3D software!
Published by Teuscher Legacy Dental – St. Charles, IL
In Part 1, we walked through this patient’s painful failing tooth, gentle extraction, and the placement of a socket preservation bone graft to maintain bone volume for a future dental implant.
In Part 2, we’re going to show you how this graft healed, how we planned and executed implant placement (see the Youtube video for more detail), and what you can expect next as the implant fuses to bone.
1 Week After Socket Preservation — Early Healing

One week after the extraction and bone graft surgery. The tissue is closing nicely, and is pink rather than deep red. Soreness was minimal. The yellow color in the center is normal, immature bone! This site is healing well.
One week after the graft, you can already see how the socket is filling in and the gum tissue is healing nicely. This early phase is all about blood clot stabilization and soft tissue coverage, which protect the graft material while the body begins to lay down new bone. Socket preservation grafts act like a scaffold the body uses to regenerate bone — almost like planting seeds in a garden and letting nature do the rest.
Bonus: Do you really need a bone graft after tooth extraction?
Key things to notice in the photo:
The gum tissue is pink and healthy with minimal swelling, and slowly closing over the extraction socket.
You may see some residual graft particles near the surface — this is normal. There aren’t any in this picture.
There’s no sign of infection, pain, or deep redness — this is an excellent early healing response.
Healing like this tells us the socket preservation graft is doing its job — maintaining ridge height and width so future implant placement will be predictable.
3D Imaging & Implant Planning

A Panoramic image taken from our CBCT Implant Planning Software. We outlined the inferior alveolar nerve in red, which is always a structure to avoid when placing dental implants in the lower jaw.
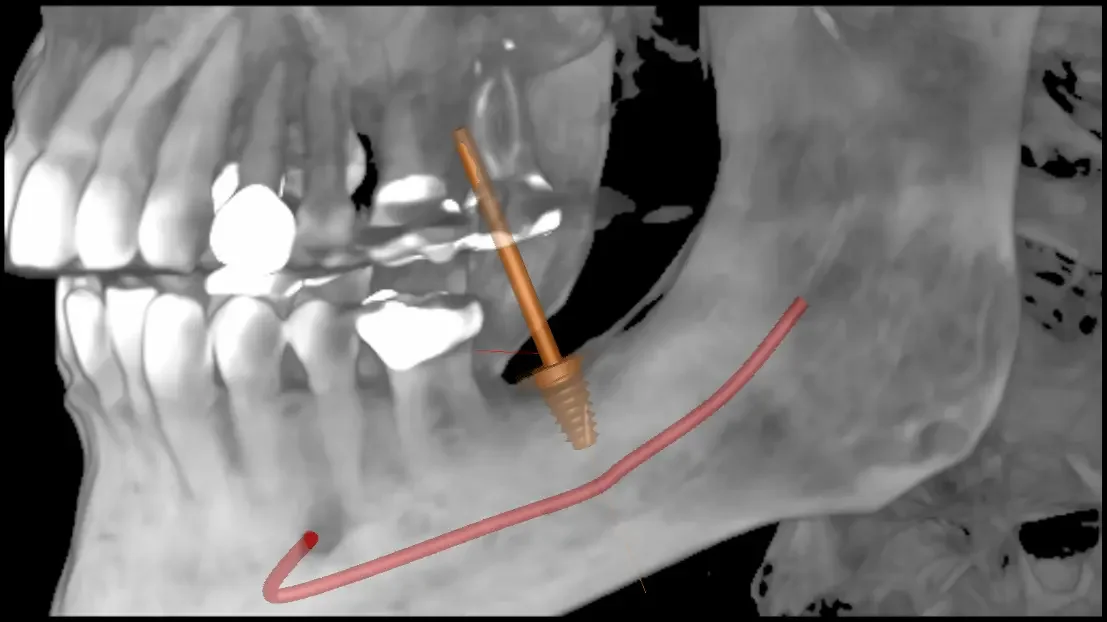
A 3D view of where the implant (highlighted in orange) is planned to go in the lower jaw, along with the inferior alveolar nerve in red. This view helps show how the bite forces will be directed on the impolant from the upper teeth.

The power of 3D imaging shown. The 2D X ray makes it seem like there is more bone below where the implant was placed. But there is really a ridge making available bone much smaller, which you can clearly see in the right sider of the image. Without a 3D scan, it would have been nearly impossible to know this.

Compare this final X Ray the day of implant surgery with the projected angles in our planning software.
Also notice where the bottom of the implant is. In the 2D X Ray, it seems like there would be more room in the bone below the implant. But we know from our 3D CBCT planning that there is not.
After eight weeks of healing, we took a CBCT scan to measure the bone and plan the implant placement (more detail in the Youtube Video above). These 3D images let us:
Visualize healed bone and ridge contours
Ensure Bone is fully healed
Select the ideal position, angle, and depth for the implant
Precisely plan the case to maximize outcomes
Sometimes incorporate a surgical guide for implant surgery, though we did not use one in this case due to lack of space in the back of this patient’s mouth. Surgical guides are useful but not always necessary.
Eight weeks of healing is a relatively short time for predictable implant placement, and it is often necessary to wait longer. In this particular case, our protocols combined with the patient’s health allowed for a shorter healing timeline. It’s also important to emphasize that instead of focusing solely on placing the implant where there is bone, modern implant planning puts the implant exactly where the final tooth restoration should be — giving the patient the best esthetics and function long-term. The CBCT imaging is vital for that process.
Day of Implant Placement — Healing Cap Placed Over Implant
On the day of implant placement, we used the plan created from the CBCT to place the implant in the exact ideal position. Since the bone was especially strong, the implant was seated with a healing cap, which helps shape gum tissue and protect the site while osseointegration occurs — the biological process where titanium fuses directly with bone. Not all implants get a healing cap the day of surgery. Sometimes it’s necessary to place that later after some bone strength has returned.
The X-ray above shows the implant well-centered in the grafted bone — exactly where we planned it to be for optimal restorative results.
Notice:
The bone prepared by the socket preservation graft creates a stable foundation. This was verified by the CBCT analysis.
A healing cap supports soft tissue for a cleaner emergence profile when the final crown is placed.

Right after implant placement, here is the photo of the implant healing cap and white sutures. The gum tissue is intentionally bunched up on the right side of the healing cap. This allows for more strong, keratinized tissue on the cheek side of the implant, which is protective for the implant’s long term health.
Why The Original Bone Grafting Worked
By preserving bone at the time of extraction and thoughtfully planning implant placement, we help ensure:
✔ predictable osseointegration
✔ better long-term stability
✔ improved esthetics and gum contour
✔ fewer surprises or complications later
The original socket preservation is not required for every extraction — but when an implant is planned, it’s often the smartest long-term choice to protect bone and support future tooth replacement.
What Comes Next in Implant Process?
Right now, this implant is undergoing osseointegration — the process where new bone grows and bonds directly to the implant surface. Once this fusion is strong (usually several weeks), the final implant crown will be fabricated and attached.
Stay tuned for Part 3, where we’ll share:
Final crown placement photos
Before/after comparisons
What the patient can expect for function and esthetics
If you’re curious about your own implant journey — from extractions and grafting to final restorations — we’re happy to walk you through what makes these steps predictable, comfortable, and successful.
Teuscher Legacy Dental — St. Charles, IL
Call or text (630) 762-0000 or visit teuscherdental.com for more information.