


Blog
Useful and free info on dental implants, cosmetic dentistry, family dentistry, and more. All posts written by our doctors, not AI or some outside marketing firm. If you are in Campton Hills, St Charles, Geneva, Batavia, Elburn, Elgin, or anywhere in Kane County, these posts will be helpful!
Not Enough Bone for an Upper Implant? A Real Sinus Lift Case, Start to Finish
The CBCT showed 6 mm of bone between the ridge and the sinus — enough to start an implant, not enough to finish one. Here's the whole case, photos included.
Upper back teeth sit directly beneath the maxillary sinus — an air space that tends to expand downward once a tooth is gone. When a patient wants an implant there, the question is rarely whether we can do it. It's whether there is enough bone between the top of the ridge and the floor of that sinus to hold one.
In this patient's case, there wasn't. After a failed root canal was removed and the socket was grafted, our CBCT measured roughly 6 mm of bone from the crest of the ridge up to the sinus floor. That is enough to start an implant, but not enough to finish one properly.
So we made more. This post walks through the whole case — the failing tooth, the socket graft, the 3D measurements, and the internal sinus lift performed through the implant site itself, with the implant placed at the same visit. It's a procedure many patients are told requires a referral to a specialist and a separate surgery. It often doesn't — this one was done start to finish in our St. Charles, Illinois office.
Key takeaways
- An internal sinus lift (also called a crestal, transalveolar, or osteotome sinus lift) raises the sinus floor through the same small opening used to place the implant — no side window, no separate surgical site.
- It is generally suited to gaining a modest 2–4 mm of height when there is already enough bone to stabilize the implant. Larger deficits still call for a lateral window approach.
- Implants placed with this technique show a pooled 92.8% survival at three years across 4,388 implants, and other reviews report better than 96% at five years.1,2
- The site was prepared by osseodensification — burs that compact bone outward instead of drilling it away. The technique is associated with higher insertion torque and lower membrane perforation rates than the original malleting approach.8
- A short, wide implant (4.6 × 7.5 mm) was chosen deliberately, so the sinus only had to be raised a couple of millimeters rather than four or five.
- This implant reached 50 Ncm of insertion torque — excellent primary stability. That let us place a healing abutment the same day and skip the second-stage uncovery surgery entirely.
- Gum thickness measured 4–5 mm, which is favorable. Thicker tissue around an implant is associated with better crestal bone stability over time.3
- We perform sinus lifts, extractions, grafting, implant placement, and the final crown under one roof — so one plan carries the case from start to finish.
In this article
- Why upper molars are the hard ones
- Step 1: A root canal that failed
- Step 2: Extraction and socket graft
- Why we placed at eight weeks
- Step 3: The CBCT — 6 mm
- Internal vs. lateral sinus lift
- Step 4: Planning the implant
- Surgery day, step by step
- Why 50 Ncm changed the plan
- Why 4–5 mm of gum tissue matters
- Are you a candidate?
- Do you need a specialist?
- Frequently asked questions
Why upper molars are the hard ones
Your maxillary sinuses are two air-filled chambers in your cheekbones. The floor of each one sits directly above the roots of your upper premolars and molars — sometimes separated by a centimeter of bone, sometimes by a paper-thin shell.
When an upper molar is removed, two things happen at once. The ridge resorbs from below, as it does anywhere in the mouth. But the sinus also pneumatizes — it expands downward into the space the roots used to occupy. You lose bone from both directions.
This is measurable. A radiographic study of extraction sites found the sinus floor dropped an average of 1.83 mm after extraction compared with the same site beforehand, and second molar sites averaged closer to 3 mm. Sites where several adjacent teeth were removed pneumatized about four times as much as single-tooth sites.4
That combination — ridge collapsing from below, sinus descending from above — is the single most common reason a patient is told they "don't have enough bone" for an upper back implant. It is also why we take socket grafting at the time of extraction so seriously in this part of the mouth. You can read our full real-case walkthrough of that step in Part 1 of our bone graft case series.
Step 1: A root canal that failed
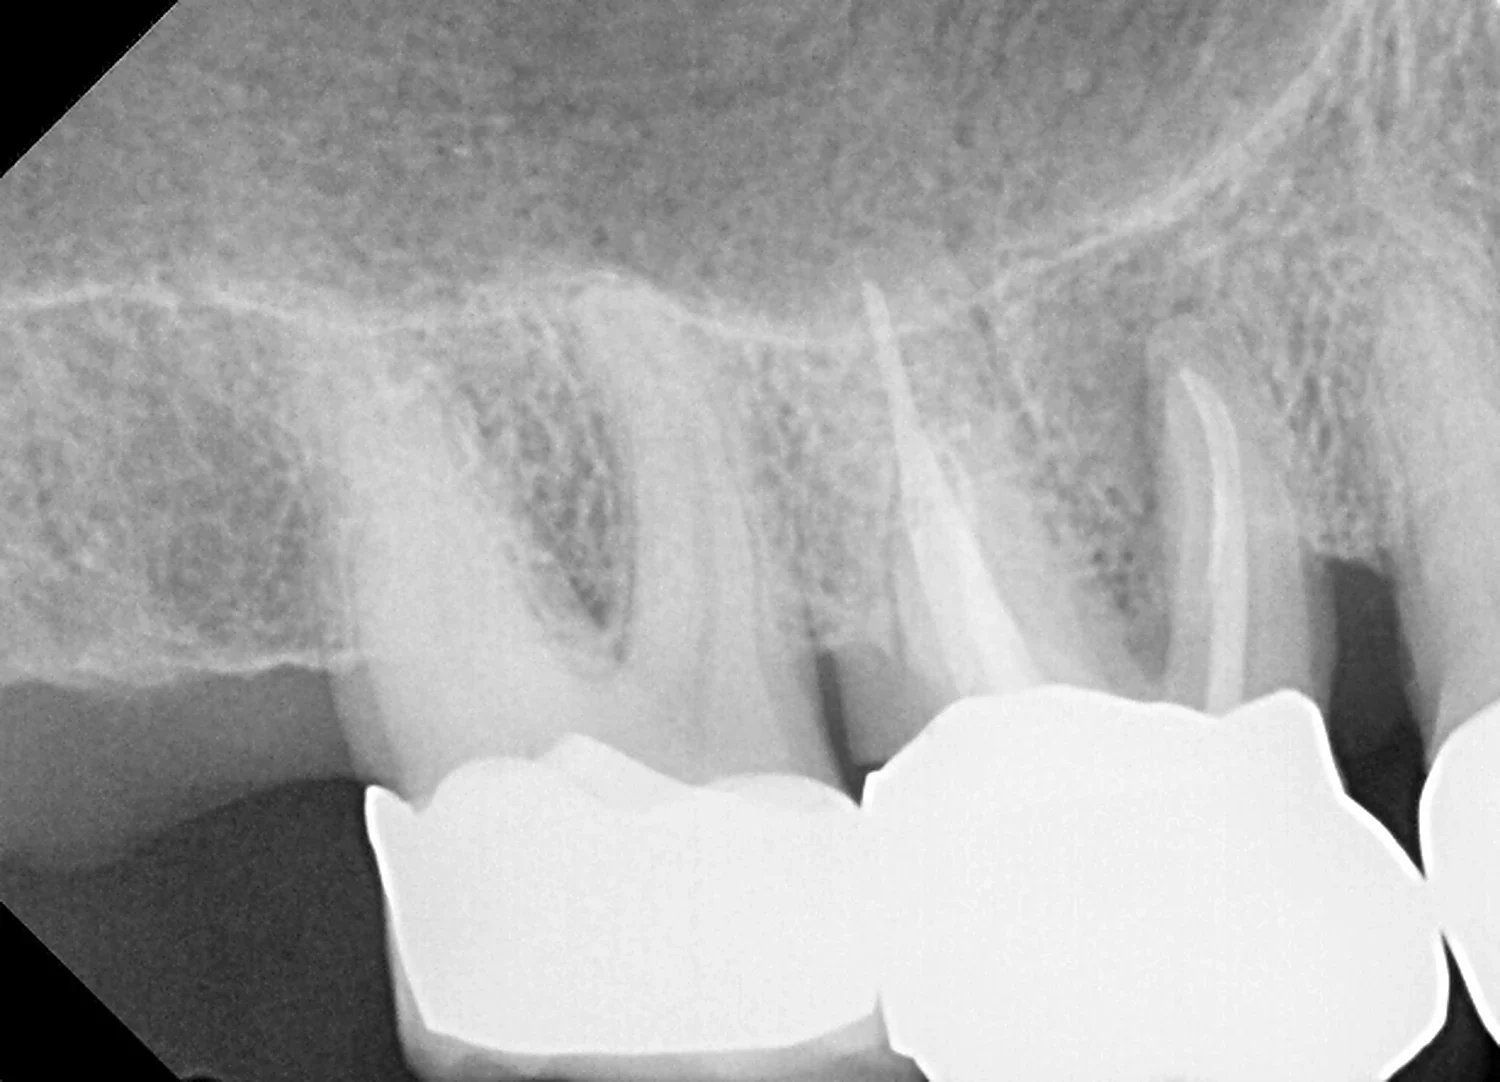
This patient came to us with tooth #3 — the upper right first molar — carrying a root canal done years earlier. The X-ray showed what we were concerned about: dark areas at the root tips, the radiographic signature of ongoing infection in the bone around the ends of the roots.
A previously treated tooth can hold low-grade infection for a long time without hurting. That is worth repeating, because patients are often surprised: no pain does not mean no problem. We wrote more about silent findings like this one in what a dental CBCT scan can reveal.
We reviewed every option before recommending removal — retreatment of the root canal, referral to an endodontist, apical surgery. In this case the combination of the infection, the amount of remaining tooth structure, and the long-term prognosis pointed the same direction. The tooth came out.
Our standard: we don't extract a tooth that can be predictably saved. When a tooth genuinely can't be, the next decision — what happens to the bone in the hours after it's removed — determines how good the implant can be two years later.
Step 2: Extraction and socket preservation graft
The tooth was removed as gently as possible, preserving the bony walls of the socket rather than expanding them. Then we filled the socket with particulate bone graft, covered it with a collagen plug, and sutured the site.
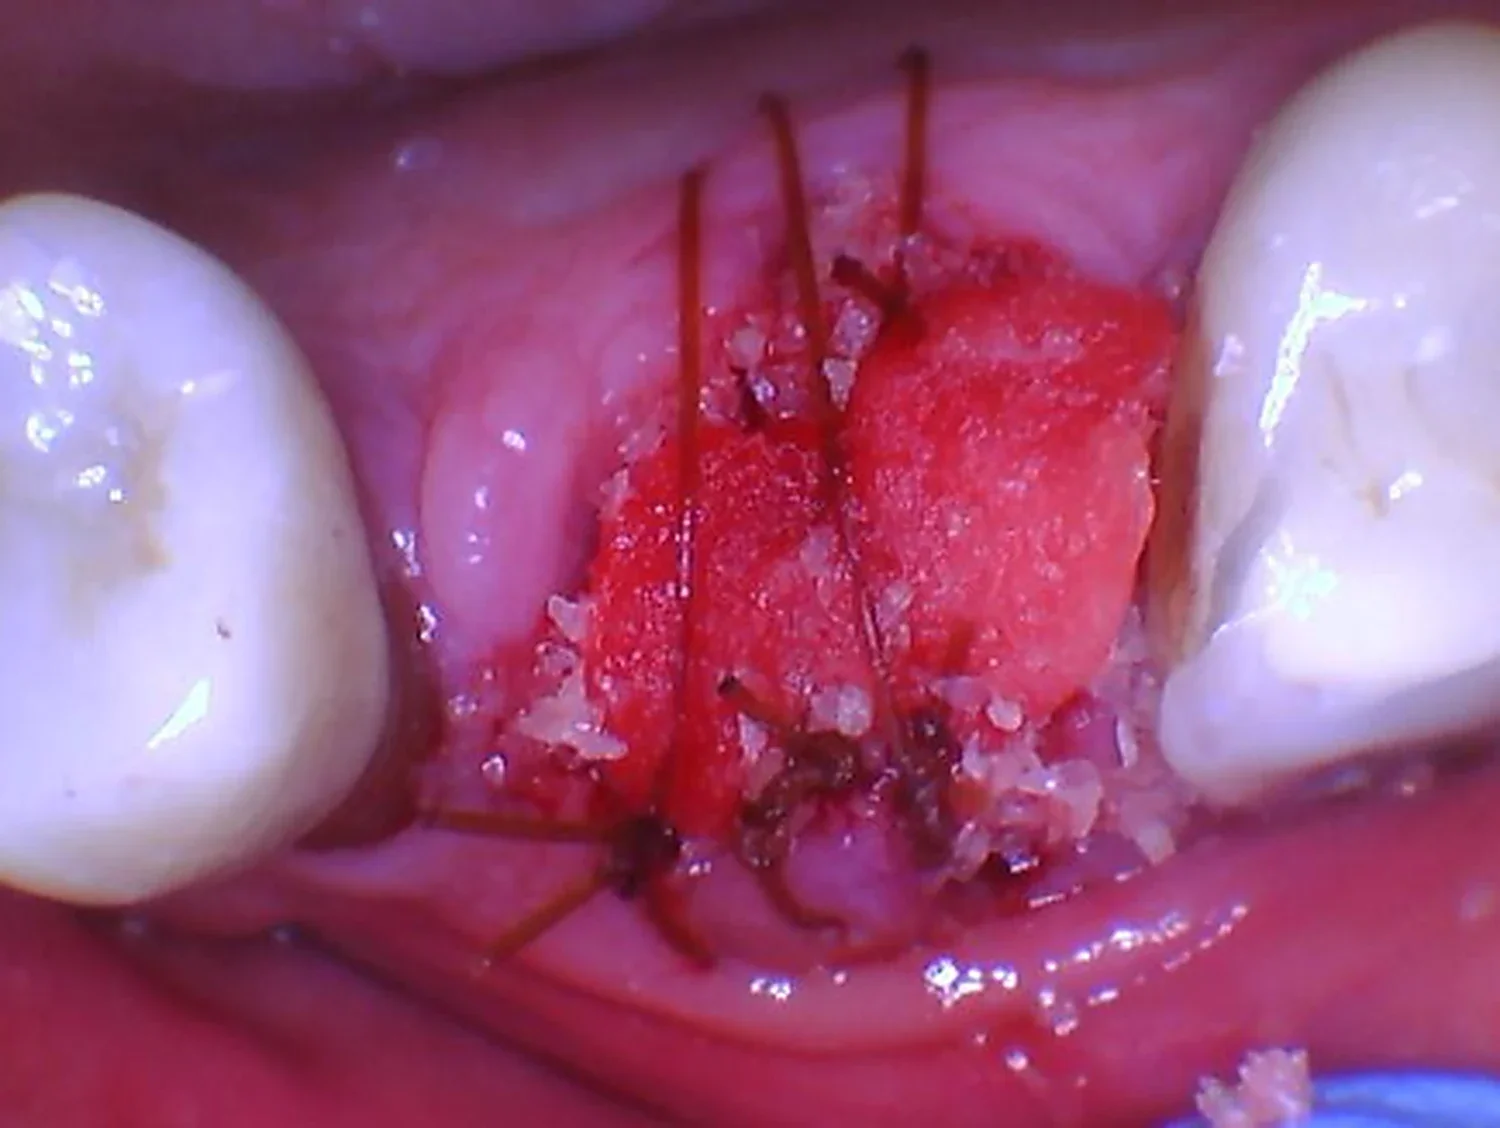
About those loose particles. Grafting is a slightly messy procedure, and this photo shows it honestly rather than cleaned up. For several days afterward you may taste or feel grit, and a few granules may rinse out. Surface particles at the edges of the site were never structural — the graft that matters is the volume packed down inside the socket, held there by the collagen plug and the sutures you can see. Losing a few from the top doesn't change the result.
What isn't routine is losing a meaningful amount out of the socket itself: a visible divot forming, a lot of material coming away at once, or the plug dislodging in the first few days. That does affect the outcome and is worth a phone call rather than a wait. Grit is expected; emptying is not. Avoiding vigorous rinsing, spitting and straws early on is the single best thing you can do to keep the graft where it belongs.
A socket preservation graft is not a bone transplant in the way people often imagine. It is a scaffold. The graft particles hold the space and give your own cells a lattice to migrate into, and over the following months your body gradually replaces that scaffold with living bone of its own.
Without it, a substantial share of ridge width and height is lost in the months after extraction — most of it within the first eight weeks.7 In the upper molar region, that loss gets compounded by the sinus expanding downward into the same space. Grafting at the time of extraction doesn't stop sinus pneumatization — but it protects the bone below, which is the half of the equation we can control.
More on this decision, including when it isn't necessary: do I need a bone graft after a tooth extraction? And if you'd like to see how these sites look as they heal week by week, we've documented that too — at one week, two weeks, and one month.
Why we placed the implant at eight weeks
Conventional guidance after a socket graft is to wait four to six months before placing an implant. We placed this one at eight weeks, and that deserves an explanation rather than a shrug — faster is not automatically better, and in plenty of cases we do wait the longer interval.
Two things made the shorter timeline reasonable here.
The first is what we grafted with. A graft weighted toward cancellous bone — the spongy, highly vascular type — with a smaller cortical fraction turns over faster than a dense cortical-heavy graft. Cancellous particles give blood vessels and bone-forming cells more surface to colonize, so the body converts the scaffold into its own living bone sooner.
The second is how we prepare the site. Because osseodensification compacts bone rather than cutting it, we can achieve strong primary stability in bone that is still maturing — bone that a conventional drilling protocol might find too soft to hold an implant firmly. The technique widens the window of when a site is ready.
Neither reason, by itself, would justify going early. Together, with a healthy patient and a CBCT confirming the graft had consolidated, they did. We verify this case by case; we don't apply an eight-week rule to everyone.
The honest version: shortening a healing timeline is only a benefit if the result holds up for decades. We shorten it when the biology supports it and we leave it alone when it doesn't — the same reasoning we apply to same-day implants.
Step 3: The CBCT — and the number that changed the plan
Once the graft had matured, we took a CBCT scan to measure what we actually had to work with. This is the step a 2D X-ray cannot do. A flat film overlaps the sinus floor, the ridge, and the roots of neighboring teeth into one image, and it routinely makes available bone look like more than it is.
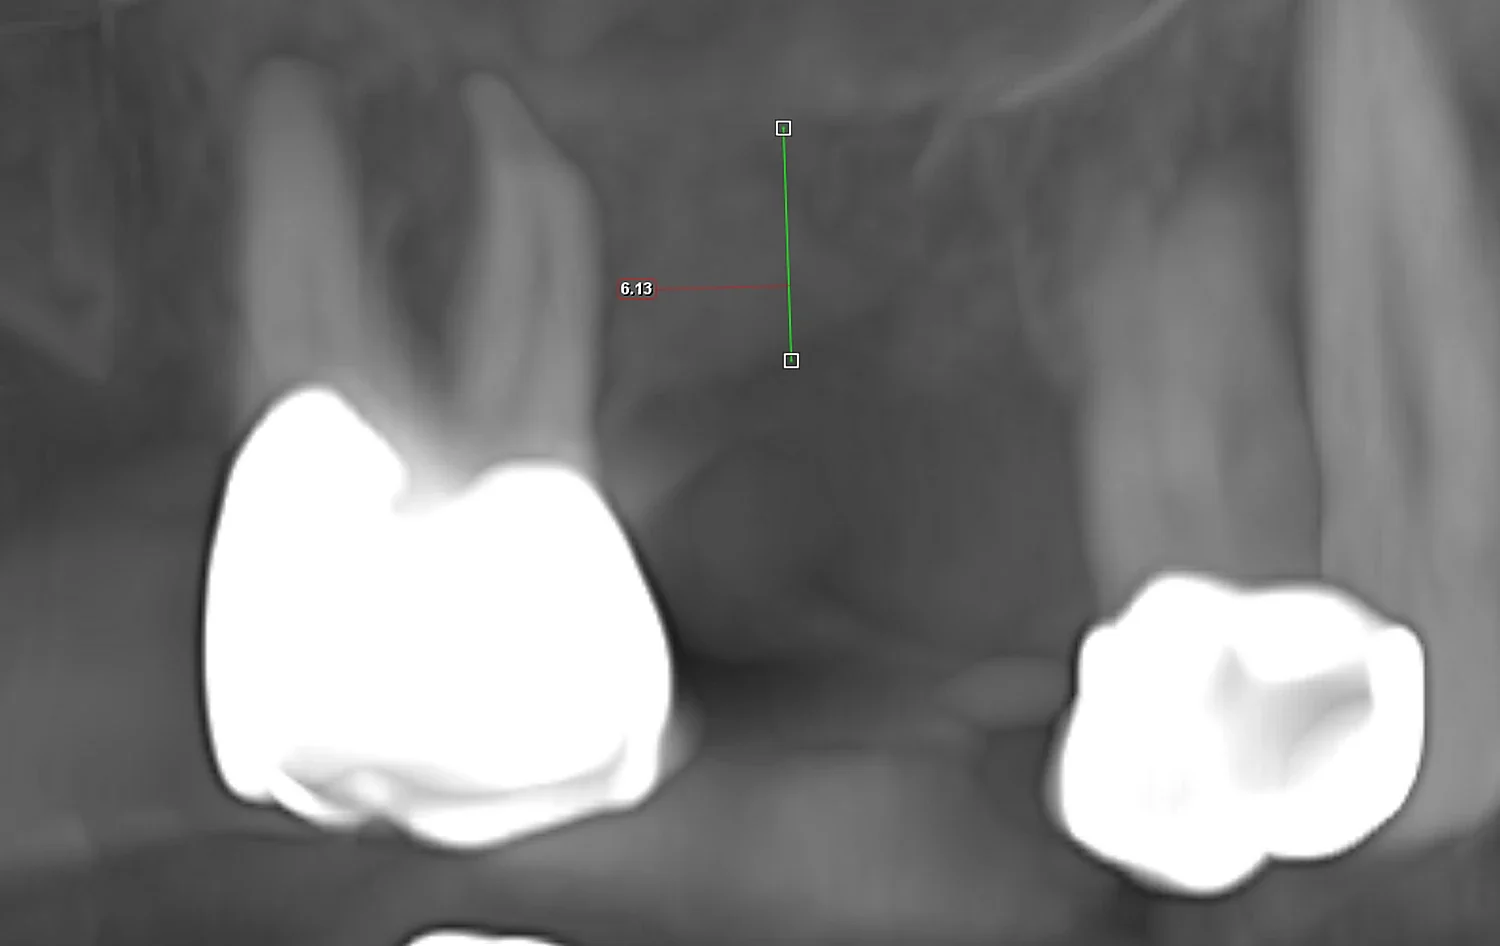
Six millimeters is an interesting number. It sits right at the decision point.
With less than about 5 mm, an implant often cannot get enough grip in the native bone to stay still while it heals, and a lateral window sinus lift — a separate, larger procedure, usually with its own healing period before the implant goes in — becomes the better choice. With 10 mm or more, no lift is needed at all.
At 6 mm, we had enough bone to hold an implant firmly on the day of surgery, and we could raise the sinus floor through the implant osteotomy itself to gain the extra height. One surgery. One site. No window through the side of the jaw.
Internal sinus lift vs. lateral window: what's the difference?
Both procedures do the same fundamental thing — gently lift the Schneiderian membrane that lines the floor of the sinus and place graft material underneath it, so new bone forms in the space created. The difference is how we get there.
| Internal (crestal) sinus lift | Lateral window sinus lift | |
|---|---|---|
| Access | Through the implant site itself, from the top of the ridge | Through a window opened in the side of the upper jaw |
| Typical height gained | About 2–4 mm5 | Larger gains possible |
| Bone needed to start | Generally 5–6 mm or more | Can be used with very little remaining bone |
| Implant timing | Usually placed the same day | Often a separate surgery months later |
| Membrane perforation | Reported less frequently than the lateral approach2 | Reported in roughly 25–44% of cases2 |
| Patient experience | Smaller site, less swelling, one appointment | Larger surgical field, more post-op swelling |
| At our office | Performed in-house | Referred to a periodontist or oral surgeon |
Swipe the table sideways to compare both approaches.
Neither one is better in the abstract. The lateral window is the right answer — sometimes the only answer — when the deficit is large. But when a case can be handled through the crest, the patient gets the same end result through a much smaller door.
The goal was never to avoid a sinus lift. It was to do the smallest one that would work.
Step 4: Planning the implant in 3D
With the anatomy measured, we planned the implant in our 3D software before touching the patient — position, angle, depth, and how much sinus elevation would be required to accommodate the implant length we wanted.
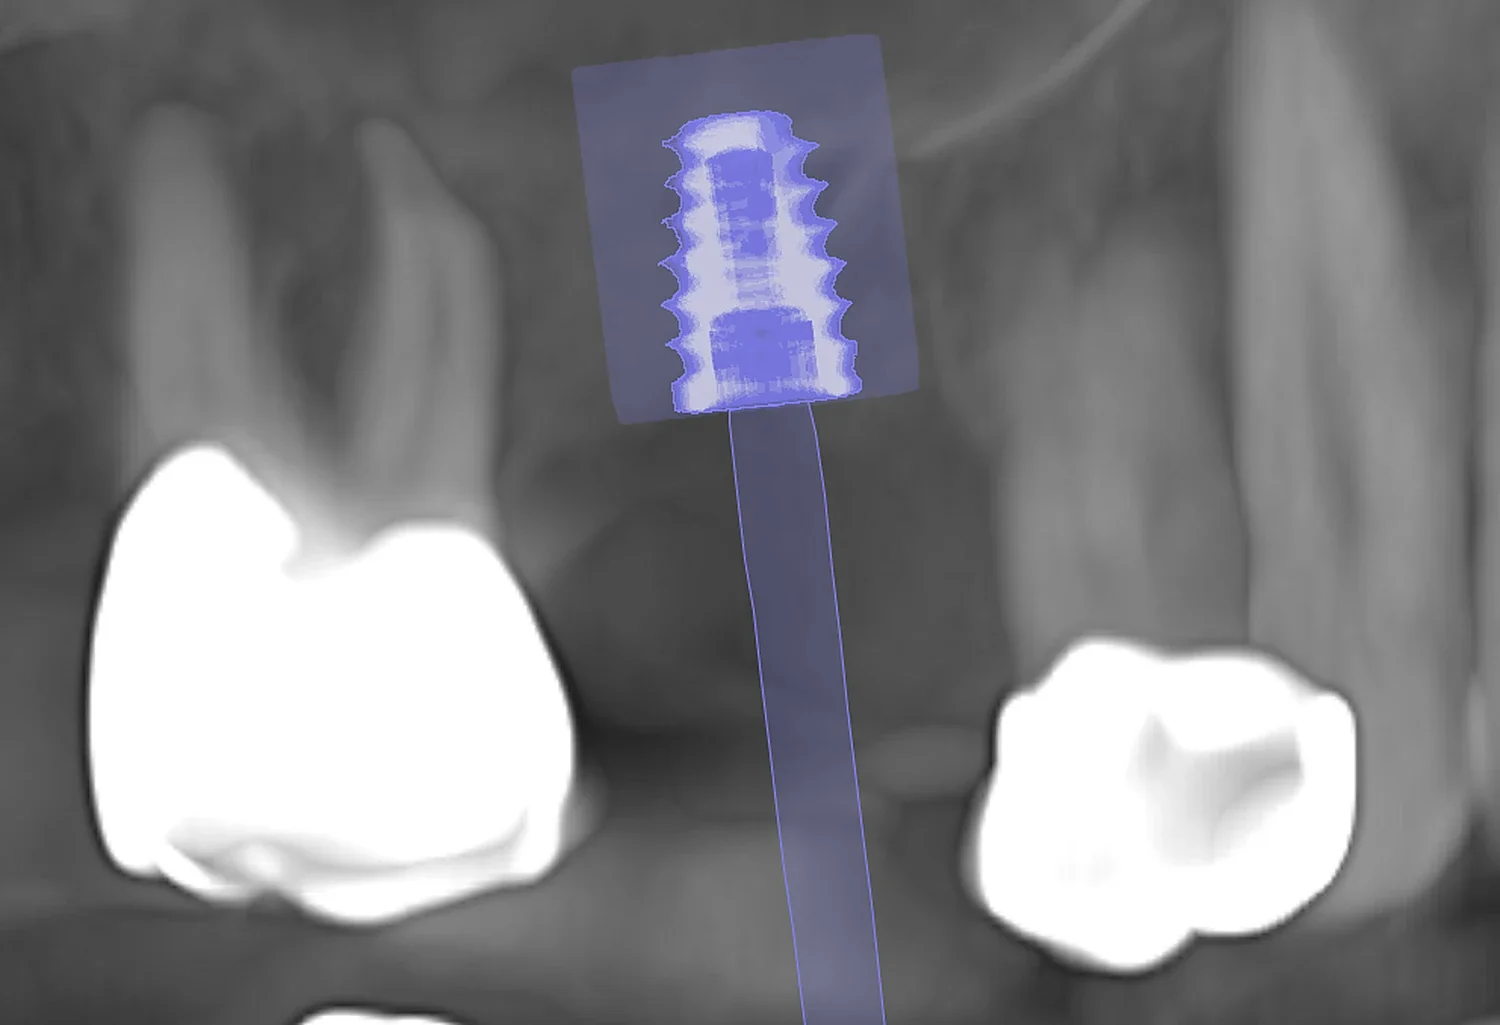
This image is the whole argument for 3D planning in one picture. The implant length that gives this patient the best long-term result does not fit in the bone that exists today. Knowing that before surgery is the difference between a planned, controlled sinus elevation and an unwelcome surprise with the patient already numb.
Modern implant planning also inverts an older habit. Rather than putting the implant wherever bone happens to be and building a crown to match, we decide where the final tooth needs to be for proper bite and appearance — then create the bone to support an implant in that position. More on that philosophy in how we use surgical guides for dental implants.
Surgery day, step by step
The internal sinus lift technique was introduced by Dr. Robert Summers in 1994 and has been refined steadily since.6 The principle is elegant: instead of cutting the bone away, you move it.
- Densify the bone instead of drilling it away. We prepare the site with Densah burs run in reverse — counterclockwise, under heavy irrigation. Rather than excavating bone and carrying it out of the site, the burs compact it outward against the walls of the osteotomy. In the posterior maxilla, where bone is naturally soft, that distinction matters enormously: we finish with a denser, stronger site than we started with instead of a weaker one.
- Stop short of the sinus floor. The preparation advances to within roughly a millimeter of the sinus, deliberately leaving a thin shelf of bone intact. The CBCT measurement tells us exactly where to stop.
- Lift the membrane with bone, not with an instrument. As the bur advances, compacted bone is propelled ahead of it and a gentle hydraulic wave lifts the sinus membrane upward. The patient's own bone acts as the cushion between instrument and membrane — which is a large part of why this approach reports lower perforation rates than the original malleting technique.8
- Graft beneath the membrane. Graft material is introduced through the osteotomy and advanced in increments. Each increment tents the membrane a little higher and creates the space where new bone will form.
- Verify the lift. We confirm the membrane is intact and the elevation is adequate before anything else happens. If a membrane tears, the plan changes on the spot — that is a judgment call made in the moment, which is why experience matters more than any single technique.
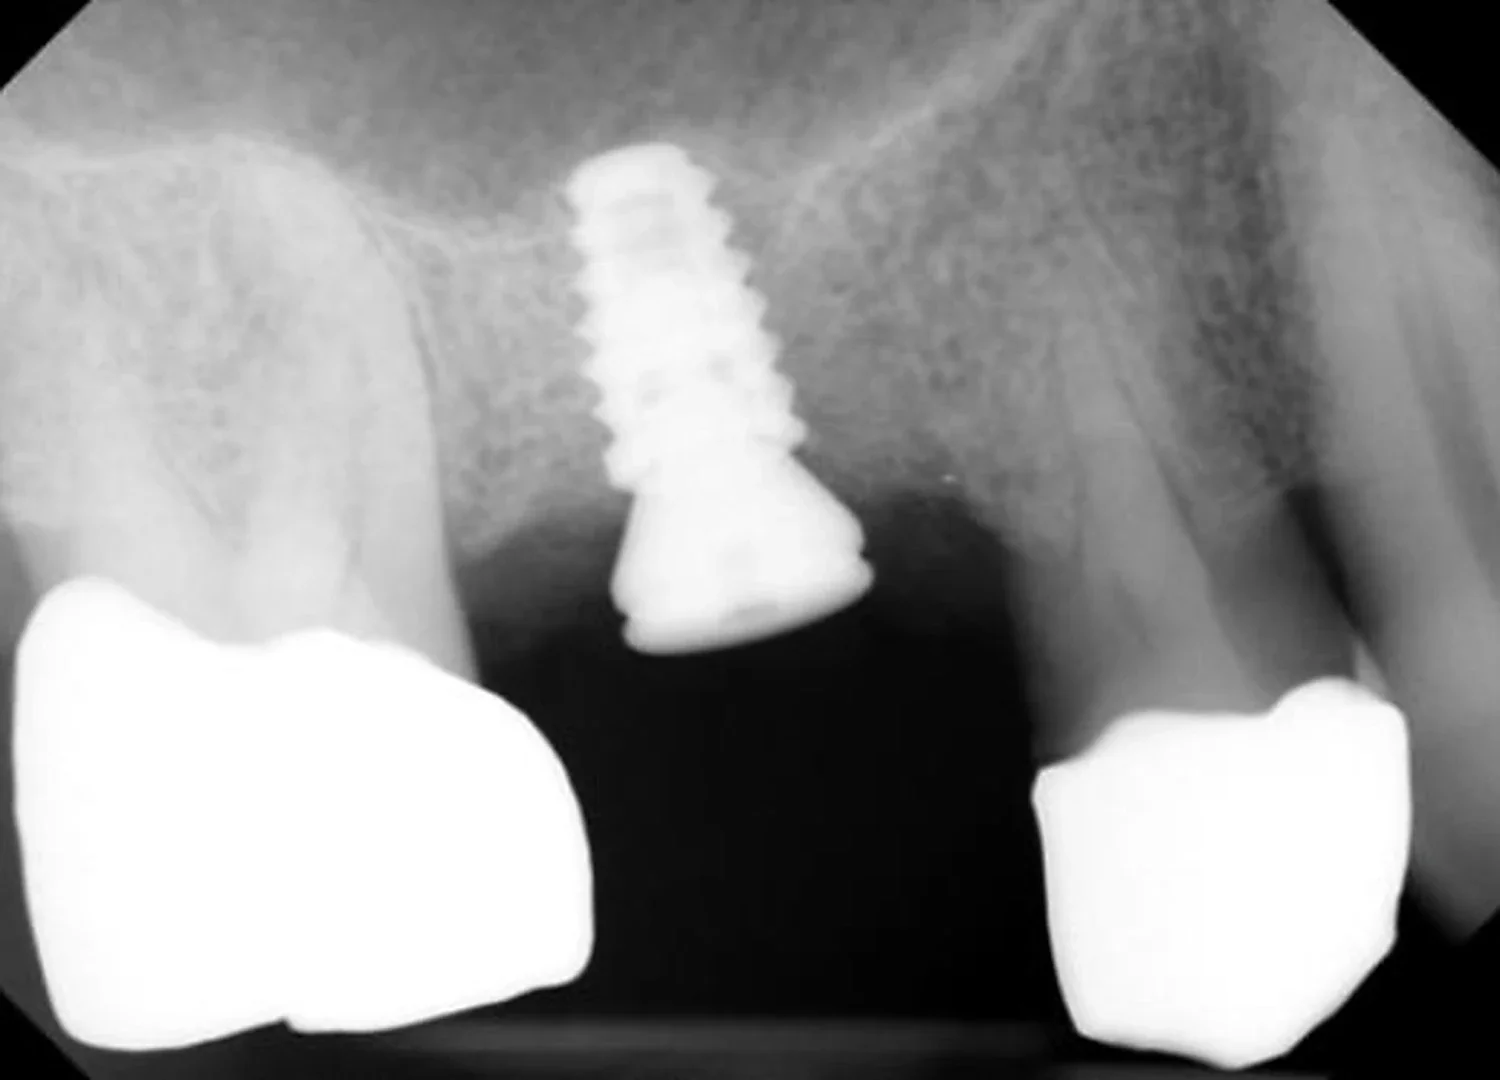
- Place the implant. A 4.6 × 7.5 mm BioHorizons Tapered Short implant goes into the prepared site, engaging the densified native bone below for stability while its upper portion sits within the newly grafted space.
- Measure insertion torque. This is the number that determines what happens next — and in this case, it determined a great deal.
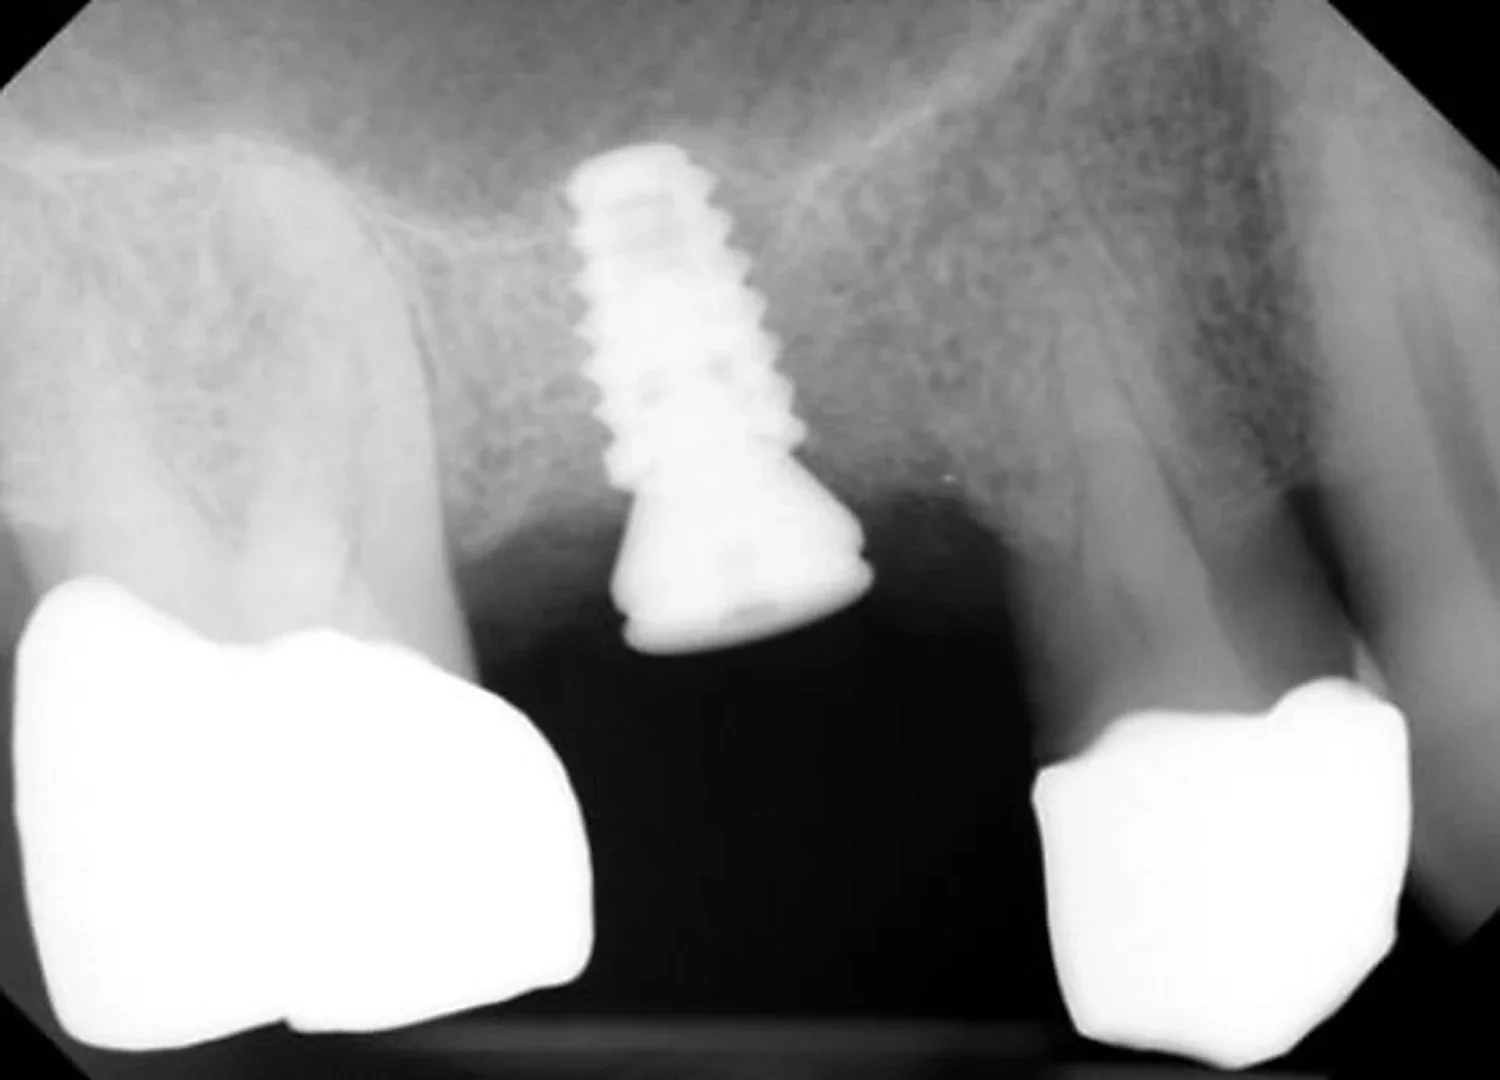
This is the image we want patients to see, because it makes the abstract part concrete. The sinus floor used to sit right about where the top of that implant is now. We moved it, filled the space underneath, and the implant is anchored through both the patient's original bone and the newly created volume above it.
Why a shorter implant was the right call here
There's a decision buried in that radiograph worth pointing out. We used a short implant — 7.5 mm — rather than a longer one, and that was deliberate.
With roughly 6 mm of bone to start, a longer implant would have demanded a correspondingly larger sinus elevation: more lift, more graft, more membrane stretched further, more that can go wrong. Choosing a short implant meant we needed to raise the sinus floor by only a couple of millimeters. Modern short implants in the posterior maxilla perform well, and the wider 4.6 mm diameter compensates for the reduced length by increasing the surface area in contact with bone.
Put plainly: we sized the implant to fit the patient's anatomy rather than reshaping the patient's anatomy to fit a standard implant. The smaller the intervention that still produces a durable result, the better.
What patients actually feel: most are surprised by how unremarkable this is. The site is numb, the pressure is gentle and brief, and because nothing is opened through the side of the jaw, swelling is typically modest. We offer oral sedation for patients who want to be more relaxed, and televisions in the ceiling for everyone else.
Why 50 Ncm changed the plan
When an implant is seated, we measure how much rotational force it takes to drive it to its final position. That figure — insertion torque, measured in newton-centimeters — is our best immediate read on primary stability: how firmly the implant is locked into bone on day one.
This implant torqued out at 50 Ncm. That is excellent, particularly in the posterior maxilla, where bone is often softer than anywhere else in the jaws, and particularly in a site that had been grafted and included a sinus elevation.
It also wasn't luck. Compacting the bone outward during preparation rather than drilling it away leaves a denser site for the implant to thread into, and studies comparing the two approaches consistently find higher insertion torque with the densifying technique.8 The instrumentation choice made earlier in the surgery is a direct reason the number came out where it did — and therefore a direct reason this patient avoided a second procedure.
This case at a glance
- Site
- Tooth #3 — upper right first molar
- Starting problem
- Failed root canal with periapical infection
- Prior step
- Extraction with socket preservation graft (70/30 cancellous–cortical)
- Healing interval
- 8 weeks, graft to implant placement
- Residual bone height
- ~6 mm, crest to sinus floor
- Procedure
- Internal (crestal) sinus lift with simultaneous implant placement
- Instrumentation
- Versah Densah burs, osseodensification sinus lift protocol
- Implant
- BioHorizons Tapered Short, 4.6 × 7.5 mm
- Insertion torque
- 50 Ncm
- Soft tissue thickness
- 4–5 mm
- Result
- Healing abutment placed same day — second-stage surgery eliminated
Here is why that matters to the patient rather than just to us. Implants are often placed in two stages: the implant is buried under the gum to heal undisturbed, and then a second minor surgery months later reopens the tissue to attach a healing abutment and shape the gum around it. Two appointments. Two episodes of numbing. Two healing periods.
When primary stability is strong enough, we can skip that. We placed the healing abutment at the same visit — a small titanium cap that protrudes through the gum, protects the implant, and begins sculpting the tissue contour that the final crown will emerge through.
One number, measured in about two seconds, removed an entire surgery from this patient's treatment plan.
This is a decision made at the chair, not in advance. We plan for the possibility of a one-stage approach, but we only commit to it when the bone cooperates. If this implant had torqued in at 15 Ncm, it would have been buried and allowed to heal quietly, and the patient would have come back for a brief uncovery later. Neither path is a failure. One is simply more efficient when the biology allows it — the same philosophy we described in our honest take on same-day implants.
Why 4–5 mm of gum tissue matters more than you'd think
We also measured the thickness of the gum tissue over the ridge: 4–5 mm. Patients rarely hear about this, but it has real consequences for how the implant looks and holds bone a decade from now.
Your body maintains a certain vertical dimension of soft tissue attachment around an implant. If the gum is thin, the body can obtain that dimension by resorbing crestal bone — trading bone for the soft tissue height it needs. A prospective clinical trial found that implants placed in thin tissue (about 2 mm or less) showed significantly greater crestal bone loss over the first year than those in thicker tissue.3
At 4–5 mm, this patient has a comfortable margin. Practically, that meant we could select a taller healing abutment to pass cleanly through the tissue, and we can expect a more stable bone level and a better emergence profile when the final crown is placed.
It is a small measurement that most patients never hear mentioned. It is also the kind of detail that separates an implant that looks good at delivery from one that still looks good in fifteen years.
Are you a candidate for an internal sinus lift?
The honest answer is that a CBCT scan decides this, not a conversation. But broadly, an internal sinus lift tends to be a good fit when:
- You're replacing an upper premolar or molar
- You have roughly 5–6 mm or more of bone between the ridge crest and the sinus floor
- The deficit is modest — you need a few millimeters, not a rebuilt sinus floor
- Your sinuses are healthy, with no active infection or significant chronic sinus disease
- You don't have anatomy that complicates a closed approach, such as a steeply sloped sinus floor or a septum crossing the site
And the cases where we'd steer you elsewhere:
- Very little residual bone, where an implant can't be stabilized at the same visit — these need a lateral window lift, which we refer to a periodontist or oral surgeon
- Active sinus infection or untreated chronic sinusitis — this gets addressed first, often with your physician or ENT
- Large multi-tooth spans needing substantial vertical rebuilding
- Uncontrolled systemic conditions or heavy smoking, which affect healing in every grafting procedure
We also want to say this plainly: a patient who has been told they need a referral and two separate surgeries for an upper molar implant has not necessarily been told something wrong. It depends entirely on their anatomy. It is worth a second scan and a second opinion to find out which situation you're actually in.
Do you need a specialist for a sinus lift?
Not necessarily — and this is worth understanding, because it quietly determines how your case gets scheduled, priced, and handed between offices.
Sinus elevation sits in a grey zone. Oral surgeons and periodontists perform it routinely. So do general dentists with surgical training in implant dentistry. The procedure doesn't belong to a specialty. It belongs to whoever has the training, the 3D imaging, and enough repetition to do it predictably — and to manage a complication calmly if one appears.
So the useful questions aren't about credentials. They're these:
- Will they take a CBCT and actually show it to you, rather than describing it?
- Can they tell you, before surgery, what they would do if the sinus membrane perforated?
- Do they both place and restore the implant, or does your case split between two offices?
- How often do they perform this specific procedure?
At Teuscher Legacy Dental, the extraction, the socket graft, the sinus lift, the implant, and the final crown all happened in our St. Charles office. For this patient that meant one surgical plan, one CBCT, one team accountable for the result, and no gap where the case belonged to nobody. Our practice is built around that continuity — four doctors covering implant surgery, prosthodontics, airway and cosmetic dentistry under one roof, so cases that would be split across referrals elsewhere in Kane County stay in one place.
That said, the honest version of this answer has a second half, and it matters more than the first.
Where we refer out. We do not perform lateral window sinus lifts in our office. When the deficit is large enough to need one — generally when there isn't enough residual bone to stabilize an implant at the same visit — we send that case to a periodontist or oral surgeon. The same goes for significant sinus disease, extensive multi-tooth vertical rebuilding, and anatomy that makes a closed approach unwise. Those cases belong in specialist hands, and knowing exactly where that line sits is part of the job.
We work alongside specialists regularly, and we'd rather send you to one at the start than discover halfway through that a case needed more than a crestal approach could give it. The point of doing the internal lift in-house isn't to keep everything; it's that a case which genuinely fits the crestal approach shouldn't be split across two offices and two timelines just because of where it was first evaluated.
We would give the same advice to someone having this done anywhere else: what you want is continuity where continuity helps and a referral where it helps, which is a judgment made on your CBCT rather than on what a given office happens to offer.
Been told you don't have enough bone for an upper implant?
We'll scan it, measure it, and show you your own anatomy on screen — then tell you honestly which approach your case actually needs, even if that answer sends you elsewhere. Complimentary consultation with a 3D CBCT scan.
Schedule a 3D implant consultation Ask us a question
Teuscher Legacy Dental · Dental implants in St. Charles, IL
40W131 Campton Crossings Dr, St. Charles, IL 60175 · (630) 762-0000
Serving St. Charles, Geneva, Batavia, Campton Hills, Elburn, South Elgin, Elgin, Wasco, Wayne and all of Kane County.
Frequently asked questions
What is an internal sinus lift?
An internal sinus lift — also called a crestal, transalveolar, or osteotome sinus lift — raises the floor of the maxillary sinus through the same small opening prepared for the dental implant. Bone graft material is placed beneath the lifted sinus membrane to create additional height, and the implant is usually placed at the same appointment. No window is opened through the side of the jaw.
How is it different from a traditional sinus lift?
A traditional lateral window sinus lift accesses the sinus through an opening made in the side of the upper jaw. It can create large amounts of new bone and is the right choice when very little bone remains, but it is a larger procedure and the implant is often placed months later. An internal lift works through the implant site itself, typically gains about 2 to 4 millimeters, and usually allows the implant to be placed the same day.
How much bone do I need for an internal sinus lift?
Generally about 5 to 6 millimeters or more of bone between the crest of the ridge and the sinus floor, because the implant needs enough native bone to be stable on the day of surgery. In the case described here, the patient had roughly 6 millimeters. Below that threshold, a lateral window approach is often the safer and more predictable option. Only a CBCT scan can determine this accurately.
Is an internal sinus lift painful?
Most patients report less discomfort than they expected. The procedure is done with local anesthesia, the surgical site is small, and because nothing is opened through the side of the jaw, swelling is typically modest compared with a lateral window lift. Oral sedation is available for patients who prefer to be more relaxed during treatment.
How successful are implants placed with an internal sinus lift?
A systematic review of 19 studies and 4,388 implants reported a pooled three-year survival rate of 92.8%. Other systematic reviews of the osteotome technique have reported survival above 96% at five years. These are favorable numbers, comparable to implants placed in sites that required no sinus elevation at all.
What does 50 Ncm insertion torque mean?
Insertion torque measures how much rotational force was needed to seat the implant in bone, and it reflects primary stability — how firmly the implant is locked in place on the day of surgery. A reading of 50 newton-centimeters is excellent, especially in the upper back jaw where bone is typically softer. High primary stability is what allows a healing abutment to be placed immediately rather than burying the implant.
What is a healing abutment, and why does placing it the same day matter?
A healing abutment is a small titanium cap attached to the implant that passes through the gum and shapes the tissue while the implant integrates with bone. When it can be placed on surgery day, the patient avoids second-stage uncovery — a separate minor surgery months later to reopen the gum and attach it. That means one fewer appointment, one fewer anesthetic, and one fewer healing period.
Will the sinus lift affect my breathing or sinuses?
No. The procedure raises the membrane lining the sinus floor by a few millimeters and places graft material beneath it. It does not enter the sinus air space in a way that changes airflow, drainage, or breathing. Patients with active sinus infections or significant chronic sinus disease should have those addressed before grafting, which may involve coordinating with a physician or ENT.
How long does the whole process take?
It varies with the starting situation. In a case like this one — extraction, socket graft, healing, then implant placement with sinus lift, then integration before the final crown — the full sequence generally spans several months. The surgical appointments themselves are relatively short. We map out the specific timeline for your case before anything begins.
Are short dental implants as good as longer ones?
In the posterior jaws, modern short implants perform comparably to longer implants, particularly when a wider diameter compensates for the reduced length by increasing the surface area in contact with bone. Choosing a shorter implant can also avoid the need for a larger grafting procedure. In the case described here, a 4.6 × 7.5 mm implant meant the sinus floor only had to be raised a couple of millimeters instead of four or five.
What is osseodensification, and why does it matter?
Osseodensification uses specially designed burs run in reverse to compact bone outward against the walls of the implant site rather than cutting it away and removing it. In the soft bone of the upper back jaw this produces a denser, stronger site. Research comparing it with conventional drilling consistently reports higher insertion torque, and in crestal sinus elevation it also allows the membrane to be lifted by the patient's own compacted bone, which is associated with lower perforation rates.
Is it normal for bone graft particles to come out after surgery?
A few, yes. For several days after a socket graft it's common to taste or feel grit and to have a few granules rinse out — you can see loose particles sitting on the tissue in the photo earlier in this post, which is how these sites genuinely look. Surface granules at the edge of the site were never structural; the graft that matters is packed down inside the socket and held by the collagen plug and sutures. What isn't routine is losing a meaningful volume out of the socket itself, a visible divot forming, or the plug coming away in the first few days — that's worth a phone call rather than waiting. Avoiding vigorous rinsing, spitting and drinking through a straw early on is the best way to keep the graft where it belongs.
How long should you wait between a bone graft and the implant?
Commonly four to six months, though it depends on the graft material, the site, and the patient's healing. A graft weighted toward cancellous bone turns over faster than a dense cortical graft, and site preparation that compacts rather than cuts bone can achieve stability in bone that is still maturing. In this case the implant was placed at eight weeks after a CBCT confirmed the graft had consolidated. That is a case-by-case judgment, not a standard interval.
Do I need an oral surgeon or periodontist for a sinus lift?
It depends on which kind you need. An internal (crestal) sinus lift isn't restricted to a specialty — oral surgeons, periodontists and general dentists with surgical training in implant dentistry all perform it, and what matters is training, 3D imaging, how often the clinician does it, and whether they can manage a complication. A lateral window sinus lift is a larger procedure and more often belongs with a specialist. At Teuscher Legacy Dental in St. Charles we perform internal sinus lifts in-house, alongside the extraction, bone graft, implant placement and final crown; we refer lateral window cases to a periodontist or oral surgeon.
Where can I get an internal sinus lift in St. Charles or Kane County, IL?
Teuscher Legacy Dental performs internal sinus lifts with simultaneous implant placement at our St. Charles office, at 40W131 Campton Crossings Dr. We serve St. Charles, Geneva, Batavia, Campton Hills, Elburn, South Elgin, Elgin, Wasco, Wayne and the surrounding Kane County and Fox Valley area. Consultations include a 3D CBCT scan, which is the only way to know whether an internal lift, a lateral window lift, or no lift at all is appropriate for your anatomy.
How much does a dental implant with a sinus lift cost in Kane County?
In the Kane County area, a single-tooth implant including the post, abutment and final crown generally runs about $5,200 to $7,000; ours comes to just under $6,100 all-inclusive. Bone grafting and sinus elevation are quoted separately, because the amount of grafting varies considerably from case to case. We give you the complete figure in writing after the CBCT, before any treatment begins.
Can the sinus membrane tear during the procedure?
It can, and it is the most common complication of sinus elevation. Perforation is reported less frequently with the crestal technique than with the lateral window approach. When a perforation occurs, it is managed at the time — sometimes with a membrane repair, sometimes by changing the plan and allowing the site to heal before proceeding. Careful CBCT planning and controlled technique are what keep this uncommon.
Clinical sources
- Tan WC, Lang NP, Zwahlen M, Pjetursson BE. A systematic review of the success of sinus floor elevation and survival of implants inserted in combination with sinus floor elevation. Part II: Transalveolar technique. Journal of Clinical Periodontology. 2008;35(Suppl 8):241–254.
- Taschieri S, Corbella S, Saita M, Tsesis I, Del Fabbro M. Osteotome-mediated sinus lift without grafting material: a review of literature and a technique proposal. International Journal of Dentistry. 2012;2012:849093.
- Linkevicius T, Apse P, Grybauskas S, Puisys A. The influence of soft tissue thickness on crestal bone changes around implants: a 1-year prospective controlled clinical trial. International Journal of Oral & Maxillofacial Implants. 2009;24(4):712–719.
- Sharan A, Madjar D. Maxillary sinus pneumatization following extractions: a radiographic study. International Journal of Oral & Maxillofacial Implants. 2008;23(1):48–56.
- International Team for Implantology. Overview of the sinus floor elevation procedure in implant dentistry — Part 2: the transcrestal approach. ITI Clinical Insights.
- Summers RB. A new concept in maxillary implant surgery: the osteotome technique. Compendium of Continuing Education in Dentistry. 1994;15(2):152–162.
- Araújo MG, Lindhe J. Dimensional ridge alterations following tooth extraction. An experimental study in the dog. Journal of Clinical Periodontology. 2005;32(2):212–218.
- Gaspar J, Mazor Z, Bonfante EA. Osseodensification technique in crestal maxillary sinus elevation — a narrative review. Clinical Implant Dentistry and Related Research. 2025;27(1):e13399. doi:10.1111/cid.13399
This article describes a single real case treated at Teuscher Legacy Dental and is intended for patient education. Individual anatomy, healing, and outcomes vary. It does not replace an individualized dental evaluation, and the approach described here is not appropriate for every patient. Clinical images are published with patient permission.